
A while ago, Colette Patterns put a call out for pattern testers. I signed up, assuming that they’d get hundreds of responses and that I didn’t stand a chance. To my surprise, they asked me to take part in testing their newest pattern, the Rue dress.
I was pretty excited if I’m honest, and, when they revealed that it would be released on my birthday I knew what had to be done; it was time to make my birthday dress.
What is it?
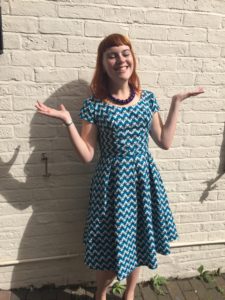
A capped sleeved dress, with curved style lines on the bodice and a pleated knee length skirt.
Is it blue?
Yup yup!

Just out of shot: a champagne saucer filled with prosecco.
Well it was my birthday!
What’s the fabric and where’s it from?
The fabric is an African wax cotton print that I found in the rag market (at the man who sells Liberty’s stall to be precise). The lining material was Monaco anti-static lining from Guthrie and Ghani in a lovely silvery grey.
What’s the pattern?
Why the Colette Rue of course!
What was good about making this?
Aside from the excitement of getting a sneaky peek at a brand new design, there were a couple of good things about this.
I love the style lines on the bodice and was pleased with the way that I was able to rotate my pieces to make the most of demonstrating this with such a bold print. It felt like it really highlighted the centre point.
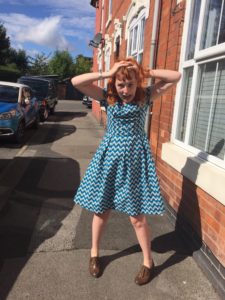
I don’t often do full lining, and even when I do a bodice lining I usually use fabrics that are fairly cotton-like (even when they are polyester…). For this dress I used a more traditional shiny lining material and it does give a more professional look to the inside (although that’s not to say I’m a total convert…).
Generally the instructions were really clear, and that made this all the easier; Colette describe the dress as being intermediate level, but it certainly didn’t feel like it!
What was bad about making this?
There was only one bad thing, and that was sewing down the lining on the bodice. My days it was a nightmare.
Lining nightmare face
The instructions for this step were pretty confusing as I’d not done something like that before, and, although they provided a link to a video that explained the technique, the video showed a sleeveless dress. Which mean it just didn’t work (to my brain at least) when trying to also deal with cap sleeves.
I had three goes at it and not one worked (in fact, one of them ended up sewing the lining to the outside of the dress. I’ve no idea how but it did). The boy had a look and he couldn’t figure it. I ended up saying “sod it” (but in slightly more…fruity… language) and leaving the raw edge sewn but exposed as no-one is going to see up my sleeve anyway!
Would you make it again?
I would. I’d consider not doing a full lining – or indeed any lining – as based on other dresses I’ve made I think this one would get away with it. I’d also like to try a sleeveless variation; I tried this on at the stage where the zipper was in and the sleeves were off and thought “this would work”. The final design idea that I’d like to try would be to add piping to the bodice, something I very nearly did this time but decided against as I thought multi-direction arrows were detail enough!
How about you? Have you had a go at Rue yet? What did you think?
x
Disclaimer: although Colette sent me the pattern for Rue for free, I received no other payment and all the views expressed here are my own.
The design lines on this are super flattering and I love how you’ve positioned the print! What a waist woman?! I’m on a pattern diet but this is seriously tempting me now! Xx
I love the fabric you picked, it came out great!
This looks awesome. Great zig-zag lines on the bodice. Very funky!